Twenty days have passed since the bees were installed in the hive, and 13 days since the queen’s release was observed. It’s time to open the hive to see if the queen is laying eggs. The bee population has been steadily declining since the bee package was installed, and it is critical for the hive to starting making new bees. Once an egg is laid, it takes three days to become a larva and six more to form a pupa, which will hatch in another 12 days. (These numbers are for worker bees; queens develop more quickly, drones are slower.) Queens typically take two to four days to start laying eggs after release, so we should see larvae in the cells today, and hopefully some cells that are capped to form pupae.
Another reason to open the hive is to inspect for parasites. Beepkeeping was simple and easy before global trade – many European households in the 18th and 19th centuries had a few hives in the back yard (or even within the house itself). Now beekeepers have to deal with Varroa destructor mites (originally from Indonesia), small hive beetles (from Africa), nosema (a protozoan probably introduced from China) – the list is extensive (see here if you want the gruesome details: http://en.wikipedia.org/wiki/Diseases_of_the_honeybee). Now, there are chemical treatments for most of these parasites, but they tend to become resistant over time. These parasites also stress the hive, which in turn makes it susceptible to viral infections for which there is no treatment. The best one can do is to keep a hive strong, minimize parasite infestation (the so-called Integrated Pest Management (IPM) approach), and accept that occasionally a hive will be wiped out. Today we are going to install a combo screened bottom board (SBB – built by me), a drone frame (purchased), and a small hive beetle trap that Dr. Hurst got from a beekeeper in Florida.

Drone frame and screen bottom board.
The drone frame has cells that are bigger than worker-bee cells, and Varroa mites prefer to lay their eggs in drone cells. The hive wants to make a few drone cells anyway, and this frame will direct the queen to localize them. Swap out the drone frame every month, freeze it for a couple of days, and you control your Varroa mite population. Put the frozen/thawed frame back in, and the bees will reclaim most of the energy they expended to make the drones by eating the now-dead larvae (yes, shades of Soylent Green). I purchased several of these frames so I can open the hive only once a month (this act also stresses the hive). The frame is green to differentiate it from the other frames.
The SBB has a bottom that allows hive beetles and mites to fall through, but keeps bees in (and out). Some people think SBBs improve hive health by lowering humidity, and it does allow more flexibility for IPM-type treatments (more on that another day), but others say keeping a hive hot diminishes nosema infection, and a SBB probably drops the interior hive temperature a bit. The SBB I built allows for the bottom to be closed up if desired; if you look carefully at the picture you can see a Plexiglass sheet lying over the screen. This sheet will be removed before installation.

Traps for small hive beetles.
Traps for small hive beetles have openings small enough to keep out the bees, but allow the beetles to enter and eat the beetle attractant (typically Crisco shortening) which has been laced with a non-volatile poison (probably boric acid). We are going to slide the black one through the bottom entrance under the brood frames – this technique worked nicely for queen release, and it allows inspection and replacement without opening the hive. (The white trap is mounted in an empty frame; we won’t use it today.)

Vent hole in the inner cover. The syrup jar was suspended over this hole.
The photo above shows the ventilation hole in the inner cover. The syrup feeding jar has just been removed – it’s clear that this feeding station has been popular with the bees. Note that some honeycomb is visible; any space bigger than 3/8 of an inch will tend to be filled in with comb.

Inner cover at hive entrance during hive inspection.
The inner cover has been removed and placed in front of the hive entrance to encourage the adherent bees to return to the hive. Bees are on congregating among the center frames, where egg laying typically begins. We smoked the hive just before doing this to calm the bees, but they still got aggressive when we start pulling up the frames.

A frame just off the center of the hive. Many larvae are evident. We could stop right here, since we know that the queen is present and laying eggs, but we decide a more thorough inspection would be worthwhile (and educational for me).

A center frame. The lower left of the frame has capped brood larvae, the upper right capped honey.

A frame almost completely filled with capped brood larvae – the sign of a successful hive. Dr. Hurst says this is the strongest new hive he has ever seen (probably due to a good queen, favorable weather, and his mentoring skills).

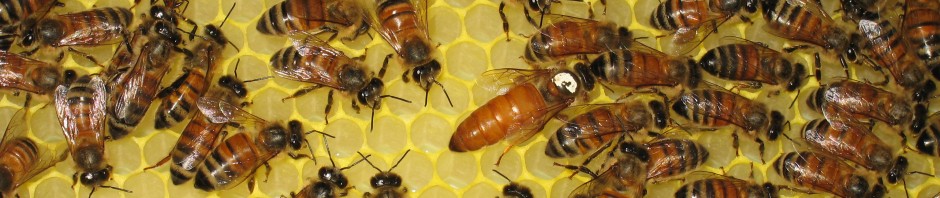
The queen is identified.
Here is the queen laying eggs on another frame. The hive seems to be working its way west among the frames, perhaps because it is a little warmer on that side. The paint is starting to flake off her thorax. At this point, even if she flew off or were killed, the hive could generate a new queen by modifying worker cells and feeding existing larvae more royal jelly, but this would set back bee production substantially – best to be careful with this frame.

Drone frame installation
We removed an outer frame that had not yet been worked, slid the frames over, and inserted the drone frame as shown. Later in the day, no bees were visible at the lower entrance, but they were back as usual the next morning, apparently having recovered from the stress of the hive inspection. I’ll be back on June 3rd to swap out the drone frame.